Monday, December 29, 2014

Apple Almond Museli

I love simple food combinations that taste amazing and make my body feel amazing.  This breakfast or snack recipe is a prime example.  6 simple ingredients: apple, almonds, ginger, lemon juice, pitted dates, and ground flax seeds.

This dish is easy to throw together, (though it does require soaking the almonds the night before), and is much easier with a food processor.

Here is some information about this dish that will help inspire you to make it.


Apples: A medium sized apple has only about 95 calories and 4 grams of soluble fiber.  Antioxidants in apples are found to help inhibit inflammation that may lead to dementia, heart disease and strokes. A compound in apples called quercetin, has been found to boost your immune system, especially when you are stressed out - and now-a-days, who isn't?!

Almonds:  These little nuts are great in helping lower "bad" cholesterol, and help build strong bones.  They are found to decrease the blood sugar spike and thereby modulate the insulin response seen after eating. Almonds also help boost brain activity and may help prevent dementia.

Ginger: Part of a family of anti-cancer and anti-inflammatory roots, ginger is great at reducing internal inflammation as seen with heart disease, arthritis, and muscle pain.  Also great for nausea, upper respiratory infections (which seem to be running rampant this year), and can help with migraines.

Lemon Juice:  High in vitamins C and B, as well as full of flavonoids which help to fight cancer, lemon juice has been found to help fight constipation, diabetes, high blood pressure, and can eliminate kidney stones.  In this recipe, the lemon juice has the added benefit of keeping the apples from turning brown once chopped.

Dates: Help to replenish the body quickly.  They are high in fiber and the antioxidant, tannin, which make them anti-inflammatory.  Dates are also high in many nutrients and minerals needed to help our vision, prevent cancer, and keep us healthy and strong.

Flax Seeds: These little power house seeds seem to have a million things that help our bodies.  A couple of the main benefits are their high levels of omega 3 fatty acids which help fight inflammation in our body.  These seeds are also high in fiber.  The whole seeds will pass right through you though, so make sure you grind them fresh when using them.

So now that you know how good this is going to be for you, let's make it!

1 medium apple, quartered and core removed
1/4 cup raw almonds, soaked in water over night then drained in the morning
1/2 a lemon, juiced
4-5 pitted dates
1/4 inch piece of raw ginger, peeled and chopped
1 tbsp. ground flax seed


In a food processor, place the apple, almonds, lemon juice, dates, and ginger.  Process on pulse until chopped to a desired consistency.  I like mine with some chunks.  A serving size is 3/4 of a cup.  Top with ground flax seed and enjoy!

Helping to guide you towards Your Sensational Self,

Shelley
Integrative Nutrition Health Coach
www.yoursensationalself.com
www.facebook.com/yoursensationalself
yoursensationalself@gmail.com

Sunday, December 7, 2014

Peanut Butter Banana Roll Up

I have been craving peanut butter lately.  Not sure why, but I am fervently embracing it.  So given this need, today's healthy snack incorporates peanut butter.

Though I still haven't embraced Elvis' favorite, peanut butter and banana sandwich, I love the combination of peanut butter and banana (almost as much as I love the combination of peanut butter and pumpkin).

This recipe includes only 5 ingredients.

You can substitute your favorite nut butter for the peanut butter.  Make sure your granola is free of high fructose corn syrup, and try to find one low in sugars. (I will post my pumpkin granola recipe later in the week for you to make - healthy and delicious)!

Ingredients:

1 banana
1/2 cup peanut or nut butter
1 cup granola
1 tbsp. ground flax seed
1 tbsp. chia seeds

Mash your banana in a bowl.  Add the peanut butter and mix until combined.  Add granola, flax and chia.  Stir until combined.  Place on a sheet of wax paper and roll out into the shape of a hot dog.
 Place the rolled mix and wax paper into the freezer for 90 minutes. (I store mine in the freezer and
slice off a piece in the morning and take it to work for a snack).  Slice off a 1-2 inch piece as a snack.
Peel off wax paper and enjoy!


A healthy snack, easy to make, and easy to take on the go.  Hope you enjoy!

Helping guide you to Your Sensational Self, 

Shelley,
Integrative Nutrition Health Coach, 

Saturday, November 29, 2014

Battle of the Holiday Bulge

Well one holiday meal down.  A day of too many appetizers, too many drinks, force feeding of dinner and somehow still finding a square inch of space to fit dessert.

Who would have thought how wonderful elastic waist pants could be!

For my family (and I am sure many of you as well), now continues a month of gatherings with family far and near, friends, and coworkers every weekend until January.

Without having to set the scale back 10 pounds so that I don't feel quite so horrible about all these gatherings, it's time to implement some strategies to fight the Battle of the Bulge!  Here are 5 steps to help you and me!

Step 1:  On those non-gathering days, focus on super healthy meals.  What the hell does that mean?  It boils down to a few simple steps.  No take out.  LOTS of leafy greens (not just as salads but steamed or braised as well).  Eat a rainbow of color at your meals - carrots, peppers, tomatoes, red cabbage, etc.  Minimal consumption of processed carbs (talking crackers, bread, pasta).  LOTS of water (shooting for half your body weight in ounces of water consumed each day).

Step 2:  Increase exercise time. 20 minutes.  That's all it takes.  20 minutes of increasing your heart rate will help to keep you sane, increase your metabolism, and decrease the desire to reach for those cravings of junk and wine.  My 20 minutes will be in the form of a HIIT (High Intensity Interval Training) workout -do a search for this to find out it's benefits.  Though even starting my day, or finding time at lunch for a 20-30 minute walk will also help.

Step 3:  Keep yourself stocked with healthy snacks.  To avoid the pumpkin cakes, donut holes, chips and candy that seems to pop up everywhere this time of year, keep an ample supply of the good stuff
nearby.  Walnuts/almonds/pistachios, edemame, apples, clementines, hard boiled eggs, avocados.  All of these will help you stay away from those blood sugar boosting, fat storage inducing snacks indicative of the holiday season.

Step 4: Pre-party Plan.  On the day of the party, make sure you are drinking all your water!  Staying hydrated during the day can help keep you more full and decrease the effects of too much alcohol. Sneak in a workout.  20 minutes.  Just move your body more than normal that day.  Have a salad before you leave the house (or company shows up).  This doesn't have to be an elaborate salad with lots of veggie chopping.  Simply grab a couple of handfuls of greens and place them in a bowl.  Use a simple dressing of olive oil and vinegar rather than a heavy, processed, calorie laden dressing.  The goal is to simply put some roughage in your belly to help fill you up.  Finally, if your party is a potluck, make sure your offering is a healthy choice.  Bring a big salad.  Roast some veggies in olive oil with a touch of sea salt.  Bring hummus and a platter of veggie sticks.

Step 5: Party time. I think an important thing to keep in mind is that you don't have to eat everything you see!  Though tempting as this always is, it's important to remember that people will generally not think you rude for staying away from some of the items on the buffet table.  Another strategy is to use a small plate - for snacks and the main meal.  Place some of the snacks you really want on the small
plate and then DON'T refill it.  Be content with the ample serving you already consumed.  Save that small plate for dinner and then make sure half that plate is loaded with veggies.  When dessert rolls around, find a friend with whom to share the bounty.  Gorging on half a cup cake and half a piece of chocolate pie will make you feel better than inhaling full servings of each.  Finally, when enjoying your cocktails and wine, mix in a glass of water between each glass to help counteract the effects of the alcohol and to fill you up!

Enjoy what the holiday season is all about - family, friends, gratitude and love.  Remember to take time to love yourself too! Take charge of the calories you consume this month and you will enjoy all those gatherings even more!

Guiding you towards Your Sensational Self,

Shelley, Integrative Nutrition Health Coach and MS OTR/L
www.yoursensationalself.com
www.facebook.com/yoursensationalself

Thursday, November 20, 2014

Shop Local this Holiday Season


This Saturday is the official day to support local, mom and pop businesses for the holiday season.  I think of these small businesses often throughout the year, but especially during peak seasons, such as the holidays.
My husband and I have had the privilege of owning and operating a home based business for over 10 years now, and are in the process of starting another one.  I have seen first hand the benefits we receive from those who also think about supporting and buying local.  I think about the impact our dollars make when we support our friends, neighbors and our local economy.  
So much of what is produced today comes from away, and so much of our money goes the same way.  In a time when families and communities are struggling, spending money locally can have an enormous impact.

Here is an example.  My husband, Mark, has been intensively farming our small piece of land for over 10 years.  While we have enjoyed a tremendous amount of local support from our small community of 3000 people, there have been times, like with most businesses, that we have had more product than we seem to be able to sell.  If those 3000 people decided to spend just 10% of their food budget on local food through us, we would sell out of all we picked pretty much every day.  We would be looking to buy more land, hire more local kids (which is where we get our summer help), and would be buying even more from other Maine based businesses.  We would not be able to keep up with demand, and the other small farms in our town would also have to dramatically increase production just to keep us all fed.  We literally dream about such scenarios.  Now imagine if this happened in many other businesses.  It is amazing how little we need to spend locally to have an unreal effect collectively.  

If you take the time to look, you will be amazed at what you can find being produced not far from where you live.  In my own town and those surrounding me there are amazing pieces of artwork, beautiful and delicate jewelry, gorgeous felted and knitted products, locally produced wines and wine products, delightful soaps, locally raised and prepared food items, gourmet teas, antiques, local bookstores, restaurants, and so many other incredible things that I would need a page just to list them all.   
With the holiday seasons approaching, this is an excellent time to start thinking about supporting your friends, neighbors and local economy.  Enjoy seeing what your fellow community members can create and display, build new friendships over that cup of coffee and a chat with an invested owner, realize who you are supporting when you take the time to walk and shop through your downtown instead of clicking the computer or hitting the box stores.
Most of all, have an amazing adventure on Small Business Saturday and share what you found for amazing items that helped to support your community!

Helping you to embrace Your Sensational Self,
Shelley Allen, Integrative Nutrition Health Coach, MS OTR/L
www.facebook.com/yoursensationalself
www.yoursensationalself.com

Saturday, November 8, 2014

Homemade Knock Off Power Bars

I am constantly looking for some sort of quick, easy snack.
Finished Homemade Knock Off Power Bars

My criteria are that it isn't full of too much processed crap, not through the roof on sugar content, and that it will not leave my kids feeling hungry 5 minutes later.

For a couple of years my solution was Clif Bars.  They worked great in a pinch on the way to sports practice, or road trips, or even if I knew dinner was going to be much later than we were accustomed too.

However, I am tired of spending $6 a box.  I dislike the number of ingredients with which I just don't feel super comfortable.  And 1 bar is way to big of a serving size for my 10 year old.

So this year I have started making homemade snacks.  My kids are a royal pain in the butt somewhat picky about the texture and shape of said homemade snacks and will not eat them if they look like a ball of poo do not resemble something with which they are familiar. So though my husband and I have enjoyed them, I am still searching for the recipe that will become my quick, easy snack for everyone.

Enter my newly purchased cookbook Power Hungry, The Ultimate Energy Bar Cookbook by Camilla Saulsbury. The author gives great recipes for knock off brand name bars (including Clif, Kind, Fiber One and Nature's Valley).

The first bar I made is called a Nick Bar and it compares to Clif Bars.  Camilla gives a ton of different ways to modify the basic recipe to create new flavors, and it seems to be one of the easiest to throw together.
Ingredients for Homemade Knock Off Power Bars

I have made them twice, once with sunflower seed butter and once with peanut butter.  My kids will tolerate them in small squares (no round balls with this recipe), and they are a great snack for my husband and I as well.

Perhaps the best parts of this recipe are that I can readily identify all of the ingredients, I can make them as organic as I like, and I can throw it all together in 15 minutes.  The recipe makes 12 full sized bars, however, they are so sweet with the dates that I find a quarter to a half a bar is plenty for a serving.  These natural sugars (with the bonus of their added fiber) make a great snack to curb those processed sugar/crap cravings.

So here is Camilla's recipe for Nick Bars.  I hope that you enjoy them and if you are looking for more power bar recipes check out her book.

1 cup packed pitted, soft dates
1 cup warm water
1 1/4 cups crisp brown rice cereal
1 cup quick-cooking rolled oats
1/4 cup coarsely chopped roasted or toasted nuts or seeds (peanuts, almonds, sunflower seeds)
2 Tbsp. ground flaxseed meal
1/2 tsp. ground cinnamon
1/2 cup natural, unsweetened nut or seed butter (peanut, almond, cashew, sunflower)
1/3 cup honey or pure maple syrup
1 tsp. vanilla extract
1/8 tsp. fine sea salt
1/4 cup miniature semisweet chocolate chips

1. Line a 9 inch square baking pan with parchment or wax paper.
2. Combine the dates and warm water in a small bowl.  Let stand for 5 to 10 minutes until the dates are soft (time will vary according to the dryness of the dates).  Drain and pat dry with paper towels.
3. Stir together the cereal, oats, nuts or seeds, flaxseed meal, and cinnamon in a large bowl.
4. Place the dates in a food processor.  Using pulses, process until finely chopped.  Add to the bowl with the cereal.
5. In a small saucepan, combine the nut or seed butter and honey.  Heat over medium-low heat, stirring, for 2 to 4 minutes until the mixture is melted and bubbly.  Remove from heat and stir in the vanilla and salt.
6. Immediately pour the honey mixture over the cereal mixture, mixing with a spatula until coated.  Gently stir in the chocolate chips.
7. Transfer the mixture to the prepared pan.  Place a large piece of parchment or wax paper atop the bar mixture and use it to spread, flatten, and very firmly compact the mixture evenly in the pan.  Cool at least 1 hour till firmly set.
8. Using the liner, lift the mixture from the pan and transfer to to a cutting board.  Cut into 12 bars.

Per full size bar:  Calories 195, Fat 7.5, Cholesterol 1 mg, Sodium 41 mg, Carbs 29.8 g (Fiber 3.2 g, Sugars 19.8 g), Protein 4.9 grams


Helping you embrace Your Sensational Self

Shelley Allen, Health Coach
www.yoursensationalself.com
www.facebook.com/yoursensationalself
yoursensationalself@gmail.com
follow me on instagram @shelley_allen24
or twitter @shelleyhealth1


Monday, October 27, 2014

Kale Salad


It's that time of year when kale is in abundance.  I tend to use this amazingly healthy vegetable in soups and wilted in a small amount of broth.  However, unlike a lot of people that I know, I tend to struggle with the bitter taste of kale when consumed raw.  

Kale is a member of the cruciferous vegetable family, along with cabbage, broccoli, bok choy, brussel sprouts  and mustard greens to name a few.  It's their sulfur -containing compounds that lend them that bitter taste, but are a great indication of high micronutrient and phytochemical levels.  According to Dr. Fuhrman and scientific research, when these veggies are broken by blending, chopping or chewing, a chemical reaction takes place that converts the sulfur-containing compounds into ITCs (isothiocyanates), which are a combination of compounds with proven and powerful immune-boosting effects and anticancer activity.

So given how important this vegetable is in improving and maintaining my health, I am constantly on the look out for a recipe where I can tolerate enjoy this green, raw. Well, I have finally found the recipe and have to share it with you all.

I found this on the blog site The Fresh Exchange.  Initially it seemed quite labor intensive.  However, now that I have made it once and am familiar with all the steps, this will be one of those easy go -to dishes in my repertoire. 

Kale Salad with Tahini Dressing
Main Salad Ingredients:
1 Bunch of Tuscano Kale
1 Large Sweet Potato
2-3 Apples of your choice
1/2 cup Pumpkin Seeds (you can replace this with nearly any nut you have on hand honestly)
1/2 tsp Paprika
1-2 pinches of Sea Salt or Himalayan Pink Salt if you have it. 
1/2 tsp curry powder
1/2 tsp turmeric
1/2 tsp cinnamon
2 tbsp Coconut Oil
Dressing Ingredients:
1 cup Raw Apple Cider Vinegar with the mother. 
1/2 Cup Olive Oil 
1/2 Cup Tahini
1 knuckle of Ginger
2 cloves fresh garlic
1/4 tsp Turmeric
a pinch of Cayenne
1 tsp honey
1/2 tsp cinnamon
Juice of 1 Lemon
1/4 tsp Paprika
To make the salad, wash and chop the kale leaves and the apples and place in a large bowl. Then, once you have chopped the kale and apples, wash the large sweet potato and skin it. Once the potato is skinned, chop it into chunks and set in a separate bowl. Melt 1 tbsp of coconut oil (20 seconds in the microwave should do) then drizzle it onto the chopped potatoes. Place the other tbsp of coconut oil in a saute pan and begin to let it melt down. Toss the remaining spices in with the coconut oil, thoroughly coating the sweet potatoes. Once the oil has warmed up in the pan, saute the potatoes on medium to low heat until they are soft and no longer crunchy. Then take the sweet potatoes off the heat and let them cool, while you allow the potatoes to cool, place all dressing ingredients in your high speed blender and blend until a smooth consistency is created. If for any reason the dressing is too thick, add a little water to it or if it seems too thin add a little more tahini.
With the potatoes cooled and the dressing done, place the pumpkin seeds in the bowl with the kale and apples as well as the sweet potatoes. Toss it all together evenly. Once it is tossed begin to slowly drizzle the dressing on the salad. Toss and add dressing as needed. The salad is then ready to serve. If you have left over dressing, keep in a ball jar for left overs. It should last for about a week.

I cannot thoroughly express how delicious this dish was.  In fact I thought it was even tastier the next day as leftovers. Try this recipe and let me know how you like it.  
p.s.
If you think this recipe is healthy just for the kale you are mistaken!  The combination of the tumeric, ginger and garlic are all great anti-cancer, anti-inflammatory and knock out superfoods.  So have another bite of salad and savor all that goodness!
Helping you embrace Your Sensational Self, 
Shelley Allen  Health Coach  MS, OTR/L
or follow me on Instagram @shelley_allen24
or Twitter @shelleyhealth1


Wednesday, October 15, 2014

Delicious and Healthy Pancakes

One of the things that I do in my home to try to save money, save time, and eat with health in mind, is to make large batches of food to freeze.  Sunday morning was pancake morning.  Now I know that you are thinking that pancakes aren't all that healthy for you, and they definitely can fall into the nothing but processed crap category.  However, they don't have to be the worse thing on your breakfast plate. I am here to share how I have found ways to increase their health benefits and still have them taste delicious.

I can not recall where I first found my pancake recipe.  At this point in time I have modified it so much that the original is a mere shadow of what I currently use.  All these modifications have created a much healthier pancake recipe.  There are a couple of easy ways to make your own pancake recipe healthier.

First, in place of a small portion of the flour add ground flax, chia seeds, wheat germ or bran.  For 4 cups of flour make 1/2 a cup one or more of these additions.

Secondly, add a fruit or vegetable such as blueberries, pureed pumpkin, apples, applesauce, smashed banana or pureed sweet potato.  You can add between 1 and 2 cups of these into a 4 cup batch of cakes.

Finally, switch from a traditional white flour to a whole wheat.  I use a stoneground wheat.  You can also substitute buckwheat or oat flour for a gluten free choice.

My family's favorite flavors of pancakes are pumpkin and blueberry.  There are times that I have combined the two (also very delicious).  I have also made banana and apple pancakes as well.  This morning was our traditional batch of pumpkin and a batch of blueberry.
New England Long Pie Pumpkins
ready to cook down for the pancakes. 

These are made from scratch (no boxed mixes here, though the modifications would definitely benefit the store bought mixes).

Here is the general recipe for a triple batch:

3 3/4 c. stoneground, whole wheat flour
1/4 c. + 1/8 c. ground flax seed
1/4 c. + 1/8 c. wheat germ or wheat bran
1/2 c. sugar
5 1/4 tsp. baking powder
6 eggs, beaten
3 c. milk
1 stick butter
2 tsp. pure vanilla extract

For Pumpkin Pancakes, add 1 1/2 c. pureed pumpkin to the milk and butter mixture.  Add 1 tbsp. ground cinnamon and 1/2 tbsp. nutmeg to the dry ingredients.

For Blueberry Pancakes, add 2 c. fresh or frozen blueberries to the milk and butter mixture.  Add 1 tbsp. ground cinnamon to the dry ingredients.

When making apple cakes, dice the apples and utilize 2 cups as an addition to the milk and butter mixture.  Add 1 tbsp. cinnamon and 1/2 tbsp. nutmeg to the dry ingredients.

For Banana Pancakes, add 1 1/2 c. smashed banana to the milk and butter mixture.  Add 1 tbsp. ground cinnamon to the dry ingredients.

For Sweet Potato Pancakes, add 1 c. pureed sweet potato to the milk and butter mixture.  Add 1/2 tbsp. allspice to the dry ingredients.

Procedure:
In a medium saucepan, melt the butter.  Then add milk until just warm.  Add vanilla.  In a separate medium/large bowl, beat the eggs.  Add milk and butter mixture to eggs and combine (add fruit at this time).  In a large bowl, mix flour, flax, wheat germ or bran, sugar and baking powder (add spices at this time).  Heat up griddle at medium to medium/low heat.  Pour the wets into the dry mix and combine.  Stir until all dry ingredients are moist.  Use 1/3 c. measuring cup to ladle out batter onto the griddle.  If your batter is really thick, use a bit more milk to thin it.  When pancakes start to have air bubbles showing through the top, then flip.  Cook until done in the middle - roughly 3 minutes.

One triple batch will make roughly 30 pancakes.  From start to finish today (minus washing a few of the dishes), I worked at this for an hour and a half.  A good investment for over 60 homemade pancakes!  Enjoy some fresh and then, when cooled, place the rest in gallon freezer bags. Stick them in the freezer, and then reheat them during the week for a great breakfast.  Make sure to use only pure maple syrup on these delicious cakes.  To make this meal more complete add a healthy protein such as a hard boiled egg or scrambled eggs, or a serving of plain yogurt.

Yours in health,
Shelley Allen  Health Coach  MS, OTR/L
or follow me on Instagram @shelley_allen24
or Twitter @shelleyhealth1

Sunday, October 5, 2014

Beet Chips

Well, I have taken a couple of weeks off, but have not been sitting idle.  I have been experimenting in the kitchen, prepping text for my new website, helping kids with homework, working and been sick.   So, in those two weeks, here is one thing I have discovered.

I am addicted to beet chips.

I have seen multiple pinterest posts about making beet, sweet potato, and zucchini chips.  As someone who has a weakness for the occasional BBQ potato chip, I figure these have to be better for me for multiple reasons.  First, I can bake or fry them myself and therefore know what it's taken to make them.  Secondly, I know the seasoning is simply salt.

So over the last couple of weeks I have been experimenting with making beet chips. And here are a couple of other things I have learned about beet chips.

1.  Mine rarely come out looking like the ones in the online pictures.

First I baked them.  I placed them on a wire rack, over a cookie sheet, and baked them (I hate frying stuff).  So here's what happened.  First, they burnt around the edges.  No matter how closely I watched them, they burnt.  However, the middle of the chips were typically still mushy. These chips didn't even warrant a picture.

So, next I cooked them in coconut oil.  I know that a vegetable or canola oil is more typical for frying foods, but these oils are inflammatory to our bodies, and therefore I try to keep my use of them to an absolute minimum.  These chips improved as I got the hang of it.  I found the ones sliced at 1/8th of an inch vs. slightly larger, came out much crispier.  Consistently, however, I found that even as I got the edges crisp, the middles were still mushy.  I did try to dry my beets on paper towels when taking them out of the oil, and then place them on drying racks to try to increase air circulation, but they were still mushy in the middle.

2. I can eat an entire beet (even one the size of a small football) by myself - is that a good thing?

So even though these two attempts did not come out looking like the pinterest posts said they should, they were still absolutely delicious. In fact, even the burnt ones were good.  I did share a few pieces of beet with my family, but found that I simply couldn't stop grazing on them.  Seasoned with a bit of Himalayan Salt these were better than any potato chip I have ever had.

I will keep experimenting with these recipes to see if I can get them perfected.  One of my friends suggested dehydrating them, which I will attempt next.  In the meantime, I will continue to eat even the ones that are less than picture perfect.  These are a delicious, sweet and salty treat and I am addicted.  This is one addiction I am willing to keep.

Yours in health,
Shelley Allen  Health Coach  MS, OTR/L
or follow me on Instagram @shelley_allen24
or Twitter @shelleyhealth1


3. I will keep making these chips and indulging in their deliciousness all winter.

Monday, September 8, 2014

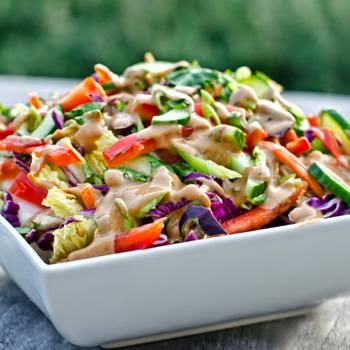
Asian Salad with Thai Peanut Sauce

So I found this recipe on this amazing website called Once Upon a Chef.  I have been drooling staring at it, on and off, for almost a month now, waiting for the day to make it.  Well,  I invited my parents and mother-in-law over for dinner last weekend in anticipation of serving this dish. (Actually I bribed them to come help me preserve food and work around the house by saying I would make dinner - but that's still an invitation to dinner right?!)

I recruited my dad to help with making the sauce and got out my handy food processor for shredding all the veggies.  This dish actually took very little time to put together (and would take even less time with pre-shredded cabbage and carrots), and the peanut sauce had amazing flavor.  We smothered everything we ate that night with the sauce!  So I can easily say DOUBLE the sauce.  It was great on chicken, rice, other veggies... The next day for dinner, I used the left over Asian salad and made raw, rice wrapper spring rolls and used the peanut sauce for dipping.  Again, simple and delicious.
My wraps didn't look quite this pretty,
 but you get the idea for using leftovers

So here is the recipe and I hope you enjoy it as well.  Enjoy Dad! Changes I made to the original recipe follow in the parenthesis.

Ingredients

For the Thai Peanut Dressing

  • 1/4 cup creamy peanut butter
  • 2 tablespoons unseasoned rice vinegar
  • 2 tablespoons fresh lime juice, from one lime
  • 3 tablespoons vegetable oil (I used olive oil)
  • 1 tablespoon soy sauce (I used Tamari to make it gluten free)
  • 2 tablespoons honey
  • 2-1/2 tablespoons sugar (I was able to cut this out and not notice a difference in taste)
  • 2 garlic cloves, roughly chopped
  • 1-inch square piece fresh ginger, peeled and roughly chopped
  • 1 teaspoon salt (I was able to cut this down to 1/4 tsp)
  • 1/4 teaspoon crushed red pepper flakes
  • 2 tablespoons fresh cilantro leaves

For the Salad


  • 4 cups chopped Napa cabbage or shredded coleslaw mix, (toss in a little shredded red cabbage for color) (I used just a regular sweet green cabbage).
  • 1 cup prepared shredded carrots
  • red bell pepper, thinly sliced into bite-sized pieces
  • 1 small English cucumber, halved lengthwise, seeded and thinly sliced (I did not de-seed)
  • 1 cup cooked and shelled edamame
  • 2 medium scallions, thinly sliced
  • 1/2 cup loosely packed chopped fresh cilantro
  • TO MAKE THE DRESSING: Combine peanut butter through red pepper flakes and process in a blender until smooth.  Then add the 2 tbsp.cilantro and pulse until smooth again.  NOTE:  The first time I made this sauce I used my Nutri-Bullet.  The sauce became VERY thick.  I had to add a splash of water to even be able to extract it from the container.  The second time I made this I used my food processor.  It was much thinner this way and still came out amazing.  
  • TO MAKE THE SALAD: Combine cabbage through 1/2 c. cilantro and toss until mixed well.  Drizzle sauce on just before serving or keep it on the side and let everyone add what they like to their salads (and meats, and other veggies)!


  • In health, and supporting you on your journey to becoming Your Sensational Self,

Saturday, September 6, 2014

Juggling

Well reality has settled on the Allen household this week.  After having what seemed to be the shortest school summer vacation ever, we are now back into the fray.

My kids have transitioned into 6th grade and 4th grade respectively; at this point without too much of a struggle.  Their days of simply playing Legos, listening to Harry Potter on audio, and running around freely have come to an abrupt halt.  They now must succumb to scheduled bed times, forced wakings by 6:30am, active intellectual engagement for 6 hours, homework, etc.  Then they must TRY to be civil and respectful to mom (who takes the brunt of their over-tired, cranky attitude) as well as too each other, before it all starts again.
Benjamin and Gabriel

My husband, who has had the benefit of help on the farm as needed, a house full of family, and summer heat and humidity, has now found himself alone for the day in much cooler temperatures.  His struggles don't include the peace and serenity that come with us returning to school, but rather with trying to run the farm by himself, helping with homework, increased housework responsibilities, and still trying to find time for family.

The role I play this year has changed, though not for any less chaotic results.  School is back in session, and though I have cut back to 4 days a week, those 4 days will be filled to the brim with working with kiddos, meetings, paperwork, paperwork, paperwork and evaluations ...(did I mention paperwork?) .  My one day off will be to work on my Health Coaching business.

Where I found I had the summer to blog 2-3 times a week, create healthy recipes, and preserve food, I find I am now struggling to juggle the time needed to help my business take off, help my kids, help on the farm, maintain a moderately clean home, fold laundry and make even basic meals.

Of course, one of my passions with Health Coaching is to help people (and myself), find ways to juggle all these demands and still find time to eat healthy, nutritious meals!  I have found that the best and easiest way to ensure that I am eating healthy, with minimal effort, and a maximum way to engage the rest of the family around meal time, is to have a weekly menu.

I will think of all the fresh veggies in season right now on the farm, think about what is in the freezer, what I have for grains that may have been forgotten, and start the basics of a 7 day plan.  At least one of those days will simply be a left over day.  I will engage my kids by having them plan one or two days of the meals.  I will simplify the challenges we all face around dinner time by posting the menu on the fridge and recruiting everyone to help chop, slice, stir and bake.

Consistently, I have found this method to be the most sure-fire way of helping us stay on track with healthy eating.

Here is an example of one of our weekly dinner menus from earlier this year:

Monday: Quiche; quinoa with sliced almonds; roasted chick peas; grilled salmon
Tuesday: Crockpot chicken; braised asparagus; sauteed sweet potatoes with roasted peppers, onions, mushrooms and garlic
Wednesday: Quinoa burritos with corn, carrots, roasted peppers, black beans and chicken; salad; green beans
Thursday: Thai chicken curry with rice noodles; peas; cabbage with apples
Friday: Homemade pizza with chicken, mushrooms, roasted peppers, onions; salad
Saturday: Leftovers
Sunday: Pork chops; rice; carrots; spinach; cabbage steaks

We may not always follow the menu exactly, but at least we all have an idea each night of what's for dinner.  It also help to cut down on the [insert whiny voice here], "mom, what's for dinner?" question every 5 minutes from 4 o'clock until we sit down at the table).  With a menu, I can also more easily delegate tasks for each family member to help with, which makes prep and clean up time much faster.

So plan your weekly menu.  Share it with us in the comments section.  See how it will help you to stay on track with healthy eating, even in the midst of chaos.  If even thinking of what to write down for meals sends you to the nearest box of mac and cheese or the take-out counter, let me know here, or on Facebook, or email, and I will be glad to work with you on creating menus and meals to help keep you eating healthy...while juggling.

In health and supporting you on your journey to becoming Your Sensational Self,

Shelley Allen
Health Coach, MS OTR/L
www.yoursensationalself.com
or follow me on Instagram @shelley_allen24
or Twitter @shelleyhealth1


Monday, September 1, 2014

Cinnamon Caramel Apple Energy Bites

One thing I am always looking for is healthy snacks for work and school.  I am talking homemade snacks, not processed stuff you buy at the store that doesn't really count as food.  I am thinking about simple ingredients, minimal work and delicious taste.

So I have been wanting to make these for the last 2 weeks and finally bought all the ingredients.  Let me tell you these, are delicious.  I substituted 1 whole fresh apple, cored, for the dried apple.  I did not bother to peel it.


Other than that one change, oh and I made them tablespoon size, this is the exact recipe from the site cupcakesandkalechips.com

INGREDIENTS
  • ½ cup pitted dates
  • 1 cup dried apples (not freeze dried, these are the chewy ones)
  • ½ cup uncooked oats
  • ½ teaspoon cinnamon
INSTRUCTIONS
  1. Combine all of the ingredients in a food processor and process until it forms a thick paste.
  2. Using about a tablespoon of the mixture, roll into balls. If you want the little bites, use about ¼ teaspoon.

Tried and tested by one of my kiddos, the neighbor and hubby, all with the thumbs up.


Enjoy!


Shelley Allen
Health Coach, MS OTR/L
or follow me on Instagram @shelley_allen24
or Twitter @shelleyhealth1

Monday, August 25, 2014

Golden Beets


I wanted to name this post "We've got the beet, we've got the beet, we've got the beet...yeah! We've got the beet", but thought it was a bit too corny (though I will be singing this song for the rest of the week!)

So right now we are starting to enjoy our golden beets.  What are these you ask?  Well, the are a beet that is golden in color and a bit more sweet than a regular red beet.  They are one of my all time favorite foods.  Plus you don't look like you have killed someone when preparing them.

I find the best way to prepare these beauties is to really look simply.  No fuss, not a lot of seasoning, no vinegar or pickling, just clean and simple.  Here are two of the best, easiest and most delectable ways I know to enjoy this amazing vegetable.  Find some at your local farmers market or grow some yourself for next year and you won't be disappointed.


Simple way 1:

Cut off the tops, peel and finely chop into a salad. (Doesn't get easier than that does it?)

Simple way 2:

Cut off the tops, (peel if you want to), coarsely chop.  Place in aluminum foil or baking pan that has been greased (I usually grease with a bit of olive oil).  Drizzle a bit of olive oil on top of the chopped beets.  Add a touch of sea salt.  Fold up aluminum foil into a packet and cook on the grill at medium heat for 20-25 minutes or until tender.  If baking in the oven, cover the pan with foil and bake at 350 degrees for 20-25 minutes or until tender.


FYI: If you choose not to peel the beets before cooking, once they are cooked, the skins will slip right off.

So please enjoy this fantastic veggie if you can find them.  They are worth the price at the market and definitely worth growing yourself.  I am anxious to create a recipe using them with my spiral food slicer! Look for that in the next few weeks!

Enjoy!

Shelley Allen
Health Coach, MS OTR/L
or follow me on Instagram @shelley_allen24
or Twitter @shelleyhealth1